Tuesday, September 27, 2016

Extra Art--Watercolor Pencil Techniques

Exploring with Watercolor Pencils
Watercolor Line Work No. 2, Tammy Garcia


  • Without water:Use like a regular colored pencil
  • Dry then wetColor your drawing and then paint over the area with a brush and plain water.
  • Wet the pencil tip: Dip the watercolor pencil in a cup of water first then apply to the paper. 
  • Wet the paper first: Dip your brush in a cup of water and run it over the area you are working on. You can then add color onto the wet surface with your watercolor pencil.


Techniques:

Sunday, September 25, 2016

The Sculpture Studio

Welcome to the Sculpture Studio!
Today we are learning about Sculpture,
Shape and Form.


In the sculpture studio, we will be creating forms from paper, and practicing two kinds of attachments.


click on link for slide demo


Paper Cylinder-Flange
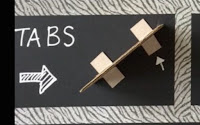
Wall-Tabs
Making and attaching a cone 


1st grade- Make a Cylinder, Flange a cylinder, Tab a wall

2nd grade-Make a Cylinder, Flange a cylinder, Tab a wall, Make a cone

3rd grade -video demo plus tab a wall and rectangular prism
Make a sculpture!


Share/Reflect:
When do you flange, when do you tab?
How do you think tabs will be useful for you in the sculpture studio?
Which work do you prefer to make? 2-D or 3-D? Why?


Tuesday, September 20, 2016

Extra Art- Attack of the Clones!!!--Repetition in Art

Attack of the clones!!!
Star Wars, Episode II


Jengo Fett's Clones

What is a clone?
Cloning is the process of creating an identical copy of an original. In biology, a clone is an organism whose genes are identical to another living organism.


Artists sometimes repeat identical shapes or objects in their art. 
Bird Fish--M.C. Escher

Golcanda--Magritte

Soup Cans--Warhol


Children's Book Illustration by Ed Young

Collage Studio Clones...


  1. Staple 4 papers together (4x6)
  2. Draw a simple large design on colored paper
  3. Cut the stack on the pencil line, keeping the papers together.
  4. When finished cutting, the shapes should be clones/copies of each other
  5. Arrange shapes on the black background in any design or pattern. They may be turned over and placed in any direction. 
  6. Add hole punches for eyes, and add any details such as buttons, nose, or polka-dots
  7. Glue down. 


Monday, September 19, 2016

The Painting Studio

Welcome to the Painting Studio!


This week we are learning about working in the painting studio. 

We are going to learn studio procedures for set up and clean-up, look at some paintings by master artists, learn how to care for the materials in the painting studio, and explore painting with watercolor paint. 

We will complete the skills we learn in our Studio Practice books.


Set Up 
  1. One Tray
  2. One Set of Watercolor Paint
  3. Carry tray to Sink
  4. One cup, fill 1/2 with water
  5. Two Brushes
  6. One Sponge
  7. One palette for mixing
I can set up my use water color paint
I can paint by dragging, not pushing the brush. 
I know my primary colors, YELLOW RED and BLUE
I can clean my brush before changing colors
I can put my painting on the drying rack before changing colors
I can clean my area  


Clean-Up
  1. Put art on the drying Rack. Under the green star!
  2. Carry tray to the sink and set it on the counter. 
  3. Dump water cup, and put in the cup tray
  4. Rinse and squeeze out your sponge.
  5. Set your palette in the bottom of the sink and clean the cups with a paintbrush.
  6. Finally, Rinse and clean your brushes. Make sure they are bristle side up!

Tuesday, September 13, 2016

Extra Art: Marion Deuchars-Fingerprinting

Author/Illustrator--Marion Deuchars

Marion Deuchars is a Scottish born Author and Illustrator
She has illustrated several books, including Let's Make Some Great Fingerprint Art, and is known for her simple bold style and unique 
hand lettering. 


Up in the Air-Marion Deuchars


With a few quick lines and shapes, her fingerprints become animals!
Notice how she sometimes turns her finger sideways to print.
and other creatures...


Short Video of fingerprint animals!!!


What can you make using fingerprints?

Demonstrate Process on Paper taped to the white board

1. Color Finger with Marker
2. Make a print
3. Wipe finger on a sponge if using a new color for next print
4. Color finger to make next monoprint.
5. After prints are made, wipe finger on sponge, and add details and background in extra fine Sharpie.
6. Color Composition with Crayon or Marker


Distribute paper and Markers with Sponges
Students get fine point sharpies as needed
Pass out crayons as students finish drawing their backgrounds and details

Sunday, September 11, 2016

Collage Studio-Actual and Implied Texture

Collage Studio

This week in the Collage Studio we are identifying and using actual and implied texture, and printing using stamps in our Studio Practice books. 


Clean Up: 


Share Time/Reflect:
Describe the difference between actual and implied texture.
What is the most interesting thing that you have discovered working with collage materials?
What did you decide to title your work? Why?


Wednesday, September 7, 2016

Extra Art- Manipulating Shadows

Thinking and Working as Artists-Manipulating Shadows

Thinking and working as artists--Shadows


What is a shadow?
How can you create a shadow?
When are shadows long? Why?


Observing, Manipulating, and Tracing Shadows
in the Drawing Studio


Share/Reflect:  
What did you learn about positioning your animal?
How did you decide what kind of background to make?